Import Roster Data Using SFTP
Discover how to import data in SchoolDay via remote SFTP server
SFTP (Secure File Transfer Protocol) is a simple way by which data can be imported into SchoolDay to update records. The export and import files should be in a comma-separated variable (CSV) format.
Before you begin
To set up an SFTP Import you will need to set up your own SFTP server. Once you have the server, you will be able to follow the steps below to set up the integration in SchoolDay.
Create an Import SFTP
To set up SFTP Integration, do the following:
-
Navigate the Application Gallery.
-
Find an SFTP app and then click Activate.
-
In the Sync Mode, select Import.
-
In the Delivery Config, use the following table to enter information in the fields:
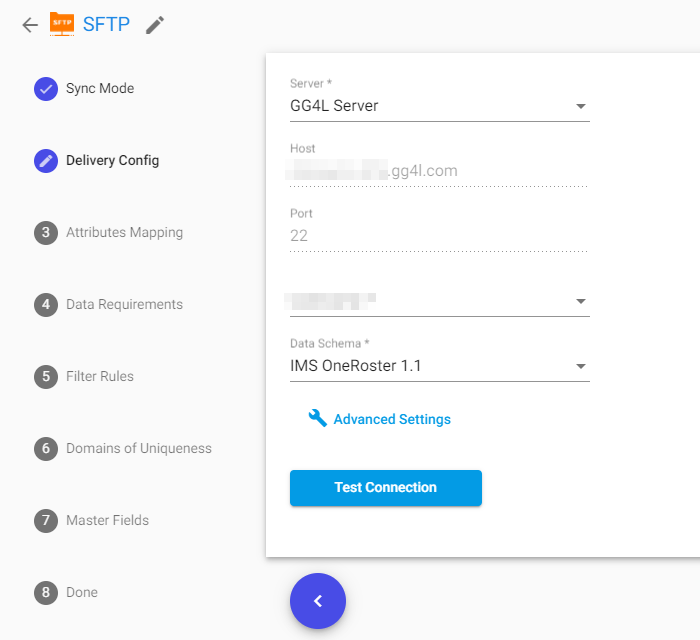
| Field | Description |
|---|---|
| Server | Select what server you want to use. We recommend you use the SchoolDay Server. |
| Host | If Custom is selected for the Server, enter the hostname of your server. For example, personal-server.sftp.com. |
| Port | If Custom is selected for the Server, enter the port number. By default is 22. |
| Username | Select New User and then enter a username that will be used to connect to the SFTP server. |
| Authentification Type | If New User is selected for Username, indicate the method by which you want to confirm the identity of users who connect to the network via a remote connection by choosing Password-based or Key-based. |
| Password | If Key-based is selected for Authentication Type, upload the file with SFTP keys. If Password-based is selected for Authentication Type, enter the password provided for the remote server. |
| Path | If Custom is selected for the Server, specify the path to the required files in the SFTP folder. If empty, files will be imported from the root to the SchoolDay. If a folder name is specified, files will be exported to that folder. |
| Use home folder | If Custom is selected for the Server, select to pull files from the root. |
| Data Schema | Select IMS OneRoster 1.1. |
| Advanced Settings | Select to customize your integration. For details about import settings, see |
| Test Connection | Click to ensure that the remote connection is configured correctly and establishes a connection to the server. |
- In the Schools Mapping, upload the orgs.csv.
- Click Next.
- In the Attributes Mapping, leave mappings by default and click Next.
- In the Data Requirements, select what action should be taken when a record attribute is either missing or invalid. If Report if Missing is selected for the attribute, a record will be accessible to your application and issue will be reported as Error. If Skip if Missing, a record will not be accessible to your application and issue will be reported as Skipped.
- Click Next.
- Finish configuration by clicking Finish Configuration on the top right.
Updated about 1 year ago
Did this page help you?