Get started with SchoolDay dashboard
The SchoolDay Connect Home page offers you various options for creating your apps and performing related tasks. These tasks range from the most simple, such as modifying your Privacy Policy, to more advanced capabilities like running API queries.

Vendor Admin dashboard
Legend:
Left navigation pane
Find what you need with the new left navigation pane. The left navigation pane shows the following menu items:

- Home: Take you to the SchoolDay Connect home page.
- Data Browsing: Search, filter, and explore the data that has been imported into the system. Also, you can view and analyze data attributes, such as field names and data types, and can preview a sample of the data. There are three types of data:
- Rostering: All data received by SchoolDay from the district/school.
- Gradebook: Data related to the grades received by the students. Here the data of those students who have passed a course and have already received a score/a grade is displayed. Those who have not received a grade yet will not be displayed here.
- Resource: All learning content that is related to a course and/or a class.
- API Explorer: Create and run API queries, test them, and send requests to existing API endpoints. Use API Explorer to perform actions or retrieve data not yet available.
- Administration: Create, edit, and delete admins and the app`s Privacy Policy. Also, set organization-level notifications to be enabled by default for new Admin accounts.
- Application Settings: If you`ve created an app, you can unpublish and edit it.
- OneRoster Compatibility Check: This tab provides information on the certification received by SchoolDay for meeting the Standards First - Compatibility Check Certification. This certification ensures that our products and services are compatible with industry standards and can operate effectively in various environments.
Search
Use the Search to find districts or schools.
To find a district, start typing one or more characters in the search bar. When you find the district you want to start working with, select it, and then on the district`s detail page click Request Access.
Help
Get help while working with your app using the built-in help. On the Help menu:
- Help Center: A compilation of help topics.
- Run Tutorial: Step-by-step lessons on SchoolDay UI and features.
- Tutorials: Playing tutorials from the current moment, not from the very beginning. For example, if you're on the Data Quality and you need more information about its functionality, by checking the checkbox on this page, you'll run a tutorial that covers only this particular page.
Applications
Use the Applications dropdown to switch between your applications and create a new one.
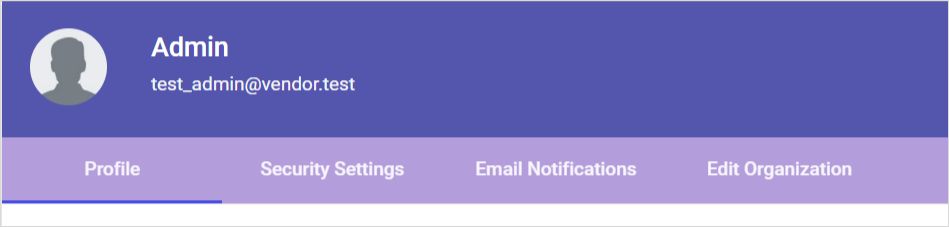
Profile settings
Select the profile dropdown to perform tasks, such as editing personal and organizational information, or restoring your password.
- Profile: Manage your admin settings. For more information, see Configure your profile.
- Security Settings: Change your password or turn on MFA.
- Email Notifications: View or update your notifications.
- Edit Organization: Update your organization information.
Districts area
In My Institutions, watch and manage connected districts. Simply click on the desired district to view more details.
Information panes
View reports from synced data sets:
- Data Sync Consents: If you have received consent from the district, but it is still pending approval, you can access it here.
- Data Quality: Review the general report about data quality errors.
District page
The district details page helps you explore, monitor, and leverage districts that use your app. When you approve consent from a district, the details page for that district appears on the Home page.
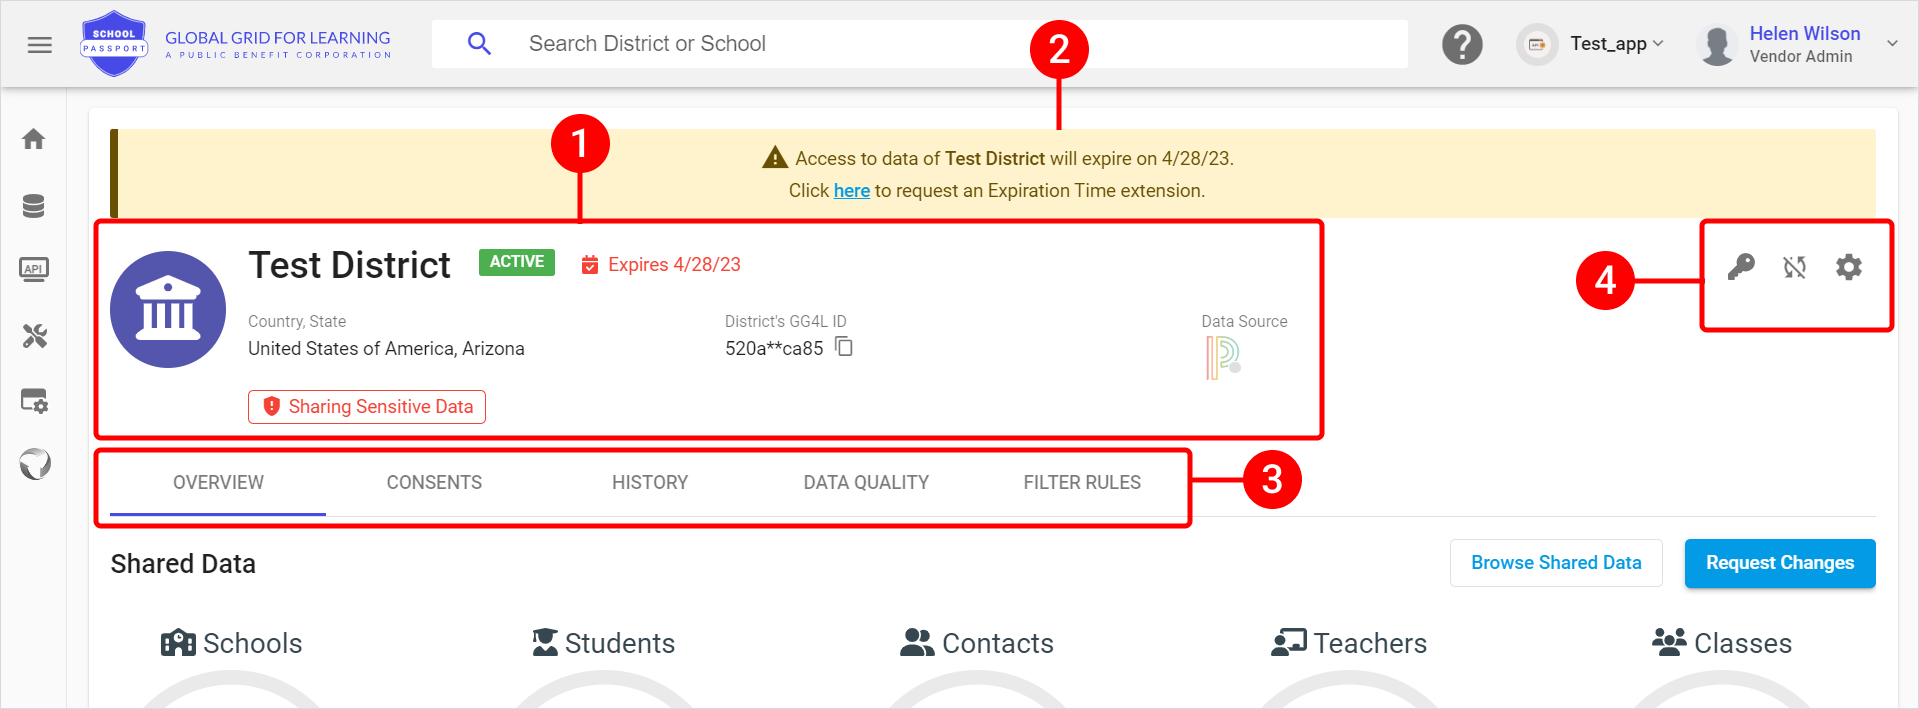
-
District info: The header at the top of the page displays important information about the district, including its name, location, SchoolDay ID, sync status, sensitivity of PII data (if set), the date when data exchange is allowed by the district, and the statuses of the district's data sources.
-
Alerts: The alert bar shows three types of notifications: informational, warning, and error.
 Info alerts: Non-critical updates or status information.
 Warning alerts: Potential issues or situations that require attention. They typically indicate that something unexpected has occurred or that there is a problem that needs to be addressed.
 Error alerts: Errors that occur within the system or application, which require immediate attention.
-
Details tabs: Below is a list of options you can view and customize from a district details page.
- Overview: A sync details like how many users or schools were shared with your app.
- Consents: A list of consents associated with the current district. Also in this tab, you can accept or reject a new data request from the District and check the list of granted attributes. Exports only.
- History: A timeline of the full sync lifecycle from the first connection until the district completely stops syncing and working with your app.
- Data Quality: Data quality details, including data quality issues, safety threshold reports, and a list of mandatory data (data Requirements).
- Filter Rules: Filters, that restrict the data set to contain only the data that satisfy a specific condition.
-
Settings: Use the app settings to review and manage sync settings with the current district.
- Credentials: Select this icon to copy the API or SFTP credentials.
- Suspend sync: Select this icon to run or stop the sync with this District.
- Sync options: Select this icon to manage district-level settings.
Updated about 1 year ago